29 February 2012

Fuji FP-100C45 - Crown Graphic 4x5 - Creative light around the house


Last night I had a little more time to work with my new Crown Graphic after work. I did quickly get a chance to take a shot outside before the light faded entirely, but for the most part I was working in my dining room. The scene was definitely something to behold considering I didn't take any lights home with me. So, like I've done a time or two before, I pulled lamps from all different rooms to put together a couple different lighting setups.


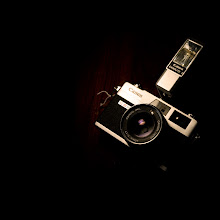
The photo at top was lit with one of those cheap pole lamps you can get from target or Walmart (like this, but all plastic). The lower arm used as a key light causing a bit of the shadow you see, and the top lamp just bouncing into the ceiling for fill. It was still a longer exposure, but it worked out pretty well. The benefit of this lamp was the ability to mix my light temperatures - the key being a compact florescent (close to daylight) and the fill a regular tungsten. The combination of those two and all the other ambient light bouncing around the room seems to be what gave the photo it's washed out, almost sepia toned, color.


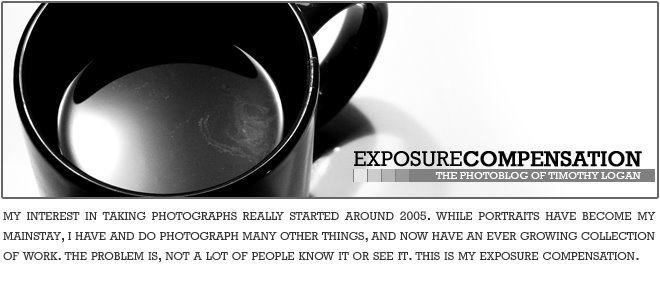
This second photo, an old(ish) coffee advertisement clock, was shot with a single light source. With the rest of the lights in the room off, I used one of those "paper shade lamps" which you can see there in the specular highlight in the glass of the clock. The light source here was completely tungsten which, with the daylight balance of the Fuji FP-100c45, shifted the color of the image more towards an orange/yellow tone. This shot also displays the extent of a close up for this camera/lens combo.


And, for good measure, here is that photo I mentioned at the top of the post that I was able to shoot outside before the light faded and before the cold ran me back inside. 


This ship, the Buffalo, has been parked in this shipyard in the Flats for a few weeks now for maintenance. It always amazes me the size of boat that is able to maneuver through this small area of the Flats and I've been wanting to get a shot of this one for quite some time now as it can normally be seen rolling down the river once or twice a week. I overexposed this image a bit more than I would have liked, but with the temperatures outside and the development time resulting from those temps I would have had to stick around for quite a while to see what my results were in order to shoot an adjusted photo.


In any event, I think I will be shooting more with this film/camera this upcoming weekend and I'll post some of those images early next week.

28 February 2012

Fuji FP-100C45 - Graflex Crown Graphic 4x5


Months ago I decided that I wanted to get into large format photography. I did a ton of research, read up on all the different formats and types of cameras, looked into the accessories for each and all the different costs. I decided right off the bat that I was probably better off starting with the 4x5 format over the 8x10. Cost obviously played a factor in that decision, but, I also thought that something like a folding press camera would be a better way to become familiar with large format, film loading, composition, etc., without jumping directly into a large monorail camera that would require learning a lot more than the basic camera movements of large format (rise, fall, tilt, shift, swing) and the results of all of those combined movements on the photo. 


The camera I decided to go with is one of the most tried and true of the press cameras - the Graflex Crown Graphic. Here's a photo of the one I just purchased -


This particular model (there are many variations within the Graphic series) comes with the f/4.7 135mm Graflex Optar lens paired with a synchronized Kalart rangefinder. With it I also got some sheet film holders, a Graflex 23 roll film adapter to shoot 120 on this camera, and a Polaroid 545 back (which at this point is nearly obsolete.) To compensate, I also went out an got the Polaroid 550 back which holds the Fuji 4x5 packfilms - FP-100C45 and the discontinued but still available FP-3000B45. The seller also threw in a few extras like an original case, changing bag, two flashes and some sync cables.


This all arrived yesterday in the mail and to this point I've really only gotten to take two photos. The ones you see here in this post are the first two out of this camera and were both shot on the Fuji FP-100C45 pack film. I didn't have a lot of time, so I pretty much just took a walk around the block with the camera and a tripod till I found something I could shoot. I also didn't have my light meter on hand, so, both of these were metered with my iPhone's free light meter app that I had previously calibrated with a real meter. The image at top, my first photo, is of the Crittenden building downtown and I used a front rise and tilt on this image to get the tilt-shift look that you see. The one below, shot in the same area, is a more straight forward photo.


These two photos were pretty much all it took to fall in love with this camera, and, with large format photography. There's nothing that compares to viewing, framing and focusing an image onto a large ground glass like you get in large format. I am really looking forward to getting out to shoot more with this camera soon, as well as the opportunity to load up a few different sheet films. The only downside... I know this camera is just a gateway drug. The 8x10 monorail camera that looked so frightening during my research seems to have become an inevitable future investment at this point.


Stay tuned, I hope to have some more interesting images to share from this camera soon...

27 February 2012

Impossible Project New PX70 Beta Test Film - Bicycles & Lollipops


I just finished up my second pack of the new PX70 test film this weekend while I was in the office working on a few other projects. Both of these were taken with available daylight using an SX70 Sonar. I definitely had a much easier time shooting these two images over the ones in my last post simply because of the warmer, controlled temperature. 


On an unrelated note - I've just purchased a Graflex Crown Graphic 4x5, polaroid 550 back and some film. Fingers crossed, it should all be here today. I've been waiting to purchase this camera for a couple of months now and I'm pretty excited to share some of my photos soon. Stay tuned.

24 February 2012

Impossible Project New PX70 Beta Test Film - Pack Two


While on the road shooting a commercial last week I got the chance to take a few photos with my second test pack of Impossible's latest PX70 formula. My results... not really the best I'd say. All of these shots were taken outside, and while it hasn't been the usual Ohio winter temps, it's still been pretty cold. I'm sure that has played a major roll in how most of these have been turning out - it's been difficult finding the right balance between keeping the photos warm and not over heating them.


For the most part, everything out of this second pack has been a bit dark and muddy. I know that most people have been shooting this batch with the lighten/darken wheel slightly towards dark, but, these latest results make me wonder if that's always necessary. To be fair, I'm still getting a good amount of color and it's still a noticeable difference from the last formula... I think I just need to get back into a controlled light and temperature situation until the weather warms up in order to see what I can really pull from this film. I've seen fantastic results from a lot of other people, so I know what's possible. Just a matter of time...


10 February 2012

Impossible Project New PX70 Beta Test Film - Pack One


I finished up my first of two packs of the new PX70 test film from the Impossible Project. I posted a few of those photos earlier in the week. This post is pretty much what I had left in the pack after I took those couple photos. In total, I ended up with six photos from the first pack... two, for some reason, got stuck in my camera. I'm not sure if it was a sticky pack issue, or if my camera is having some problems of it's own.


Like most people, my experience with this film has been really positive. The improvement in color is dramatic and noticeable. There's a nice bit of latitude in the tonal range and like the PX 100 test film I shot in December I've noticed that the point of focus in my photos seems to be sharper than in previous versions of the Impossible film.


I've shot now under a couple different lighting conditions - indoors with professional grade artificial lighting, outdoors with available light, and indoors using just a lamp. There is definitely a color shift depending on your light temperature and the best color is seen around daylight balance. Early versions, especially the push, didn't seem to favor color temperature one way or another... everything generally had that beautiful magenta shift no matter the light conditions. This is definitely a more accurate daylight balanced film. And of course, like all Impossible films, temperature plays a big role in the development process of the new PX70. That goes for the development time, overall contrast and plays a role in color shifting.


The one thing that I have noticed about this film is that my photos have had really long development time. Of course, the color film from Impossible have always taken longer to develop than the black and white, but my experience with this film so far has been up to 15-20 mins on average to get a fully developed photo. It's not really a problem, just a minor inconvenience with the shooting style I've developed while working with Impossible Project's films. Generally, I like to shoot, see what I get and then adjust and reshoot if necessary. When I have to wait twenty minutes to find out if I need to make adjustments it makes that process a little difficult.


So far though, I love this film and the progress I see every time the Impossible Project roles out a new film. I still have one pack of the test film left and hope to be shooting (and sharing) those photos soon.

08 February 2012

Impossible Project PX 600 Black Frame PP - Workshop Test Images


Here are just a few more images from the workshop this past weekend. For anyone who's followed along with my images and the one's Scott posted over on his site... this are probably starting to look a little repetitive. I guess that's the downfall to 30 people taking photos of the same subjects all afternoon.


Above, is my first test of the lighting setup where we had Anthony staged. I lit this with a Mole 1k in a softbox and a Mole 650w fresnel spotted with a couple of scrims. The softbox was gelled for daylight, which doesn't matter in this image since it's black and white, but many people were shooting Impossible's PX680 and PX70 films. This, of course, is Impossible PX600 Black Frame in an SX70 Sonar with an ND pack filter.


Now, the two images below were taken during the workshop as part of a demonstration showing why you need to shield your images. Of course, since it was a live demonstration, something odd happened...


Shielded from light as normal
Not shielded for first 5-10 sec

As you can see my first image turned out just as it should have, shielded the proper way. The second image, however, is the one that caught me by surprise. Shot immediately after image 1, I didn't shield this image at all coming out of camera. I then grabbed it, held it up to show everyone what an undeveloped photo looks like, waving it around for a few seconds before finally putting it in my back pocket with the other photo. The temperature had been giving us issues all day, so I just got in the habit of keeping them warm. I'm not sure if it was the heat or what, but my exposed, unshielded photo turned out almost as good as my shielded. There is a slight sharpness different and a bit of contrast difference but it is still much more than I expected to get at all.

Anyone else have any similar experience? Maybe Impossible is closer to an unshielded image that I thought...

06 February 2012

Impossible Project New PX70 Beta Test Film - Aperture's Impossible Workshop


This past weekend over at Aperture we held the first Cleveland based Impossible Project workshop with great success. We had a great turn out of, I believe, almost thirty people from all around the area with a range of different experience levels in using the Impossible films. There was a classroom-like session where Aperture's owner Scott Meivogel and myself went over all of the different camera types and the variety of Impossible films that are available for each. We did a little live shooting with our very helpful models for the day, covered shooting basics, tips, tricks, and possible problems and fixes. It was an overall crash course to get everyone up and running with a bit of knowledge most beginners don't have access to without a lot of individual research.


Of course, everyone had a chance at the end of the class to roam about the space and shoot their own images either with their own camera or one that we loaned them. We had a couple models hanging around to shoot with, and a few different still life set ups pre-lit for them to take advantage of as well. It probably comes as no surprise that I found a little time to pry myself away from answering questions to fire off a few shots of my own. The two images you see above are from Impossible's new PX70 test film that I got in the mail recently. Both are under artificial lighting conditions with an SX70 Sonar. For now, I'll just say that I am very impressed with this film so far and look forward to shooting my second pack very soon. I won't get into all the details in this post, but I'll have a few more images and a full review of the film posted later this week.


With all that said, I'll finish up by sharing a few frame grabs from some video that was taken during the workshop. Hope you enjoy... I definitely did, and I'm looking forward to doing it again soon.


Myself (left) and Scott (right) going over some test images before people arrive

Impossible Film - What's not to love?

We probably talked too much...

Scott looking over some images with our lovely models Anthony and Ashley